Fuel for the Soul

Nourish the Body, Nourish the Soul

Free Fitness Friday: Interval Workout #2

FitnesskellypuryearComment
Treadmill Interval Workout #2

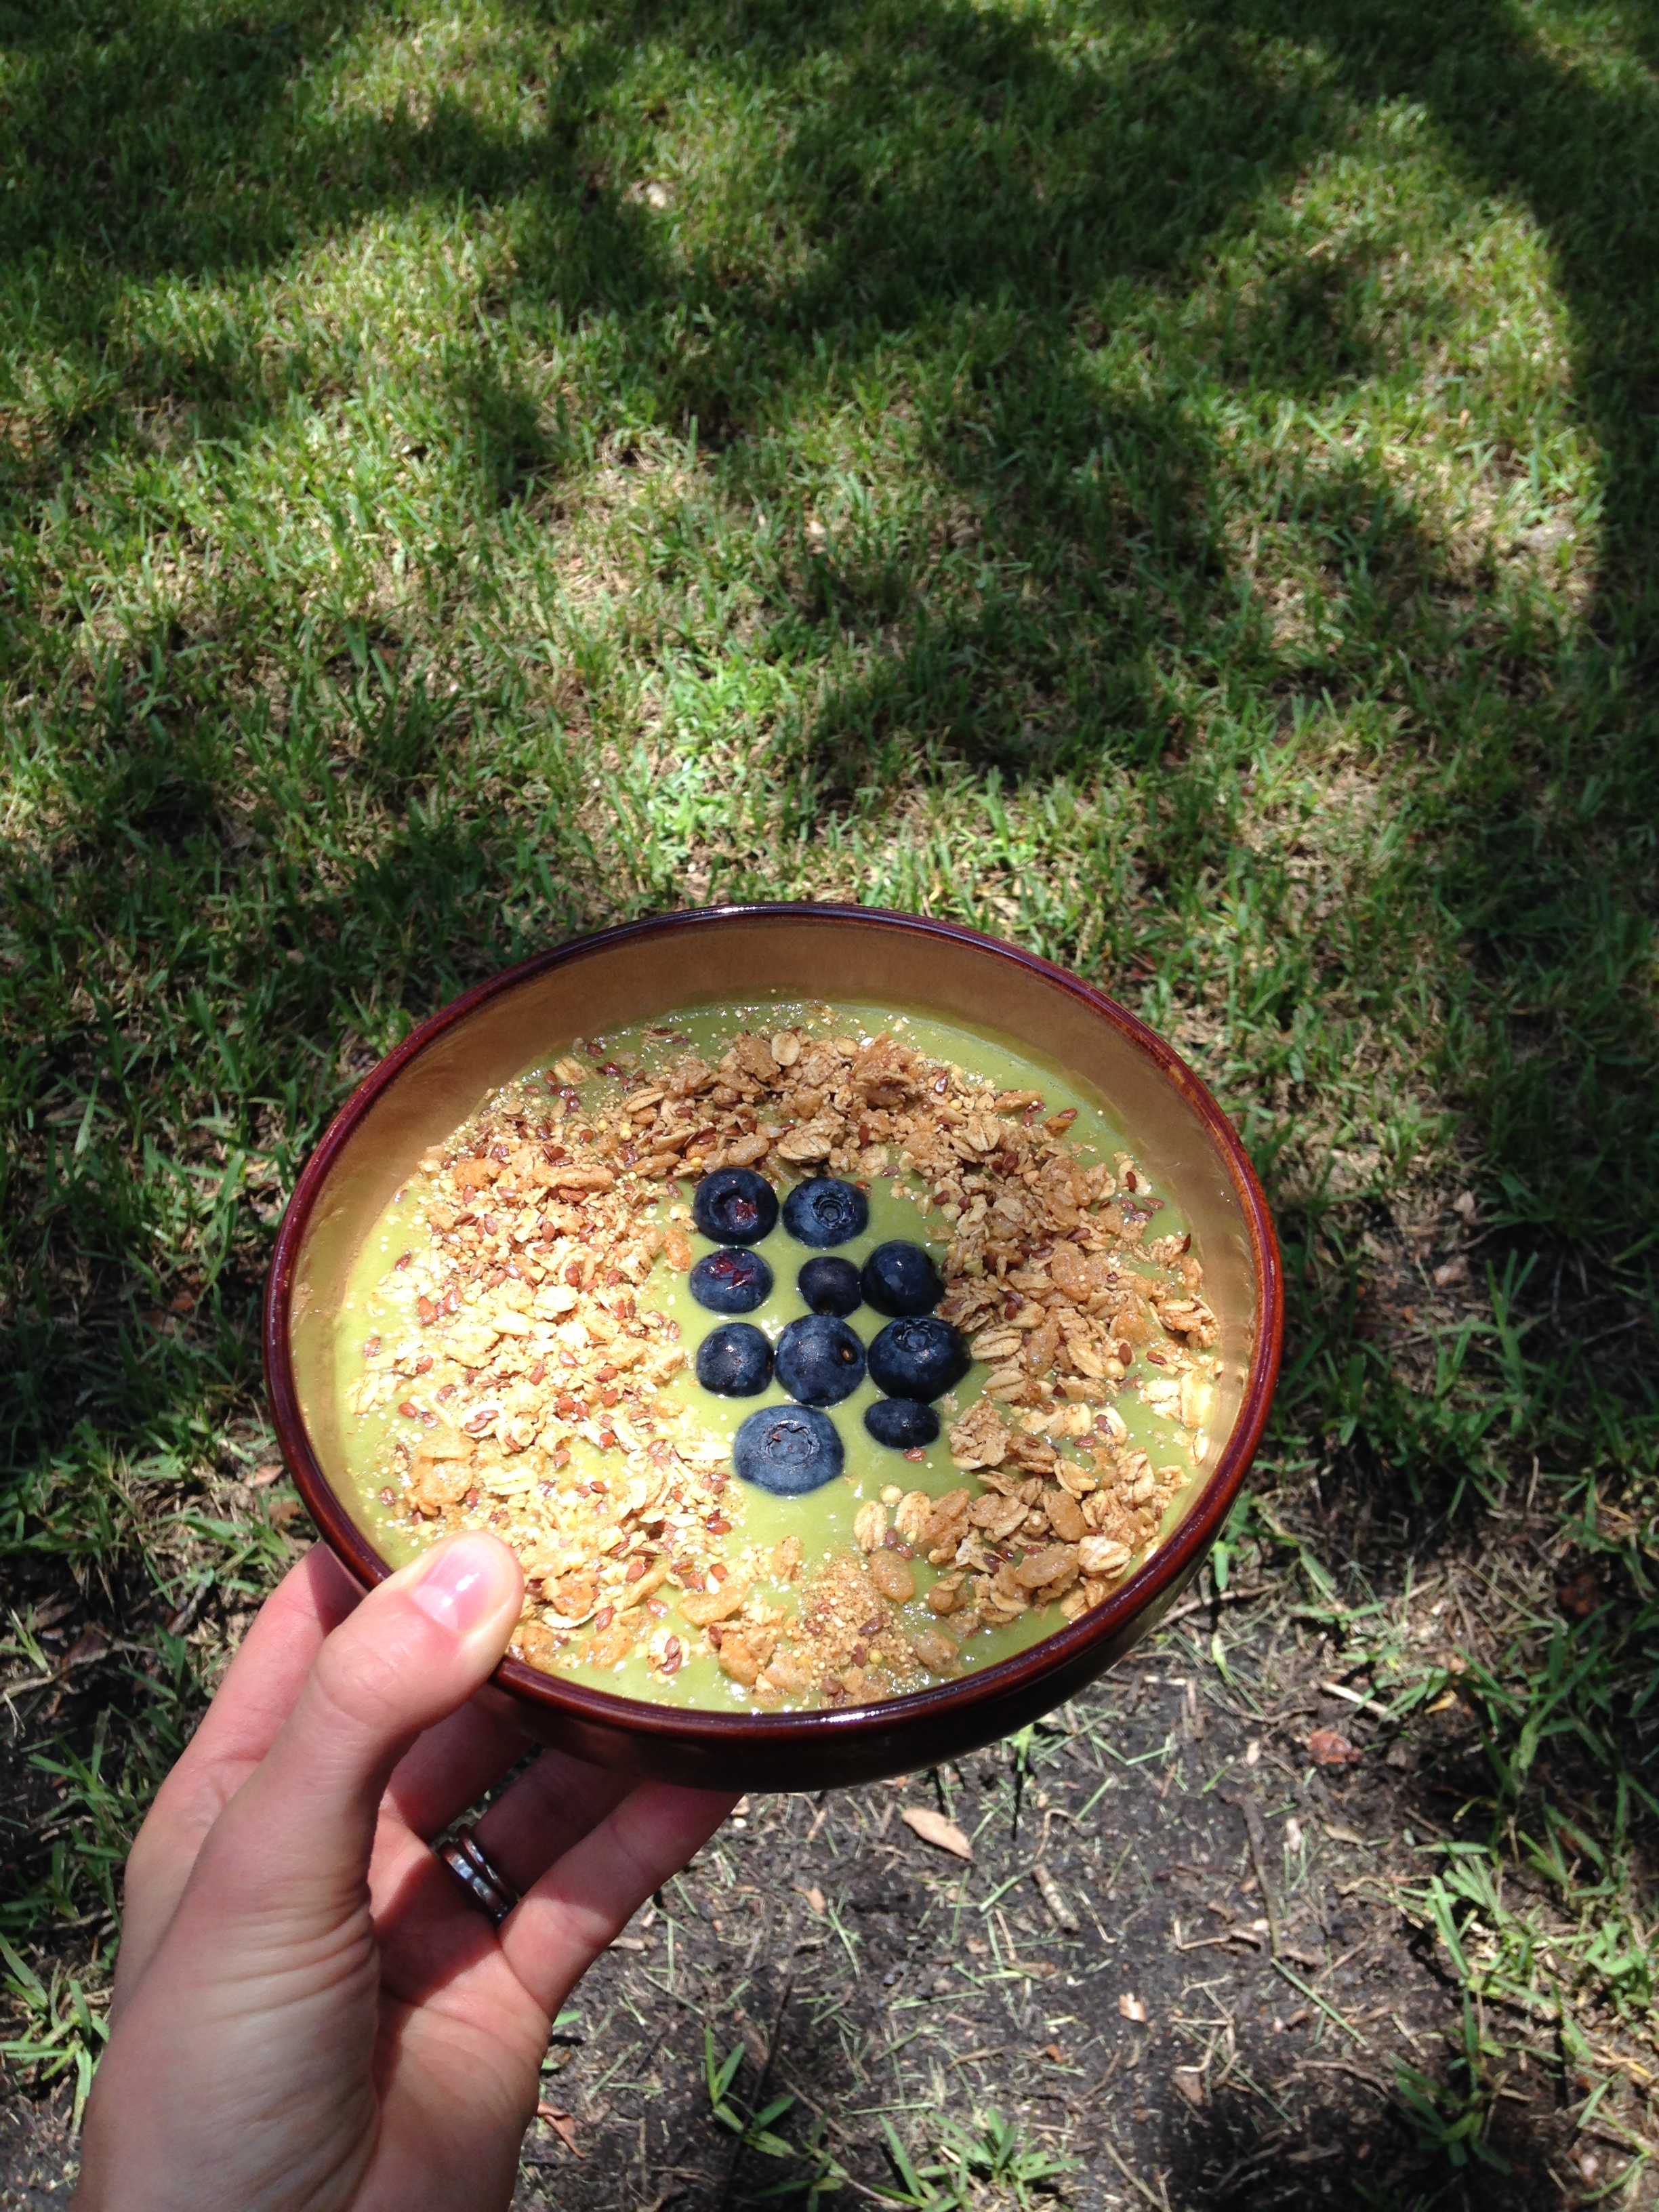
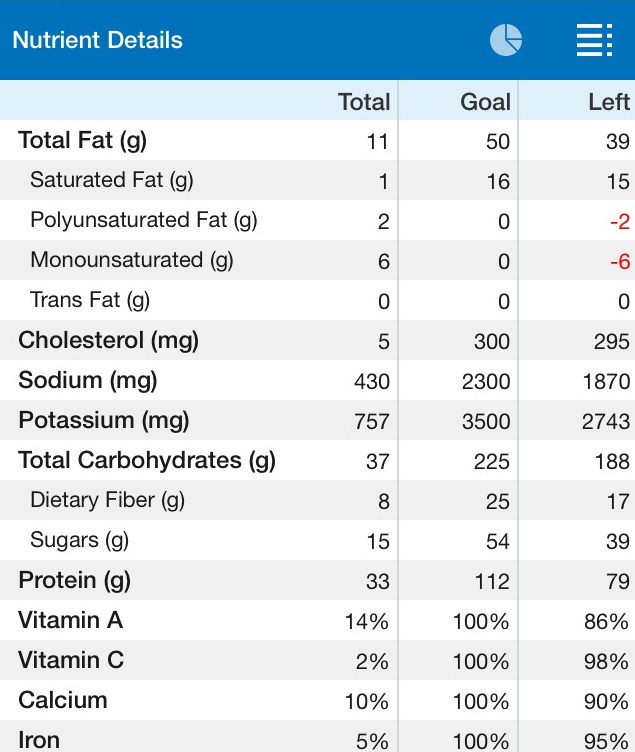
So here we are again friends, it's finally Friday! And this Friday I am heading home to visit my family for one last vacation before my dietetic internship starts on August 24th! I am so excited to spend quality time with my family and have been busy getting everything ready for my trip (washing clothes and cleaning the house, packing for the week ahead, and setting up my client schedule for the week while I am away). With all I had to get done before my flight later today, I still made time to squeeze in a quick cardio workout and (though I only ran 3 miles on the treadmill) I burned nearly double the calories of a steady-pace 3-mile run and I was completely exhausted after just 25 minutes on the treadmill!

How is this possible? As I mentioned in last week's Free Fitness Friday: Intervals for the Win, you can still get the health benefits of cardiovascular exercise in a quick 25- minute workout when you incorporate Interval Training - and you will burn twice as many calories with Interval Training over the same distance run in a shorter amount of time!

Today's workout was less complex than last week's interval workout and my 3 miles were up before I knew it! So here it is!

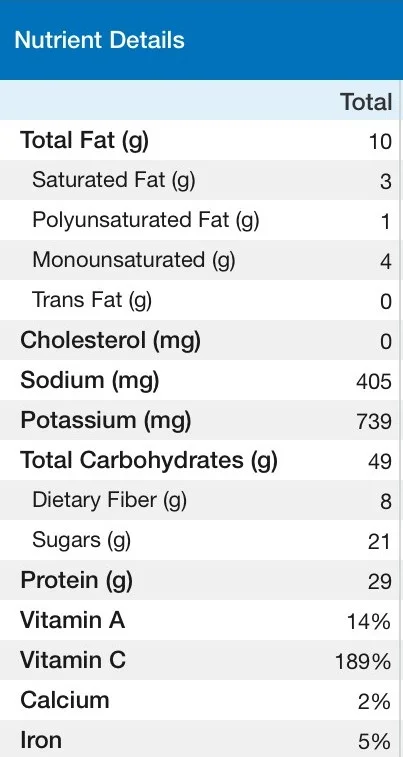
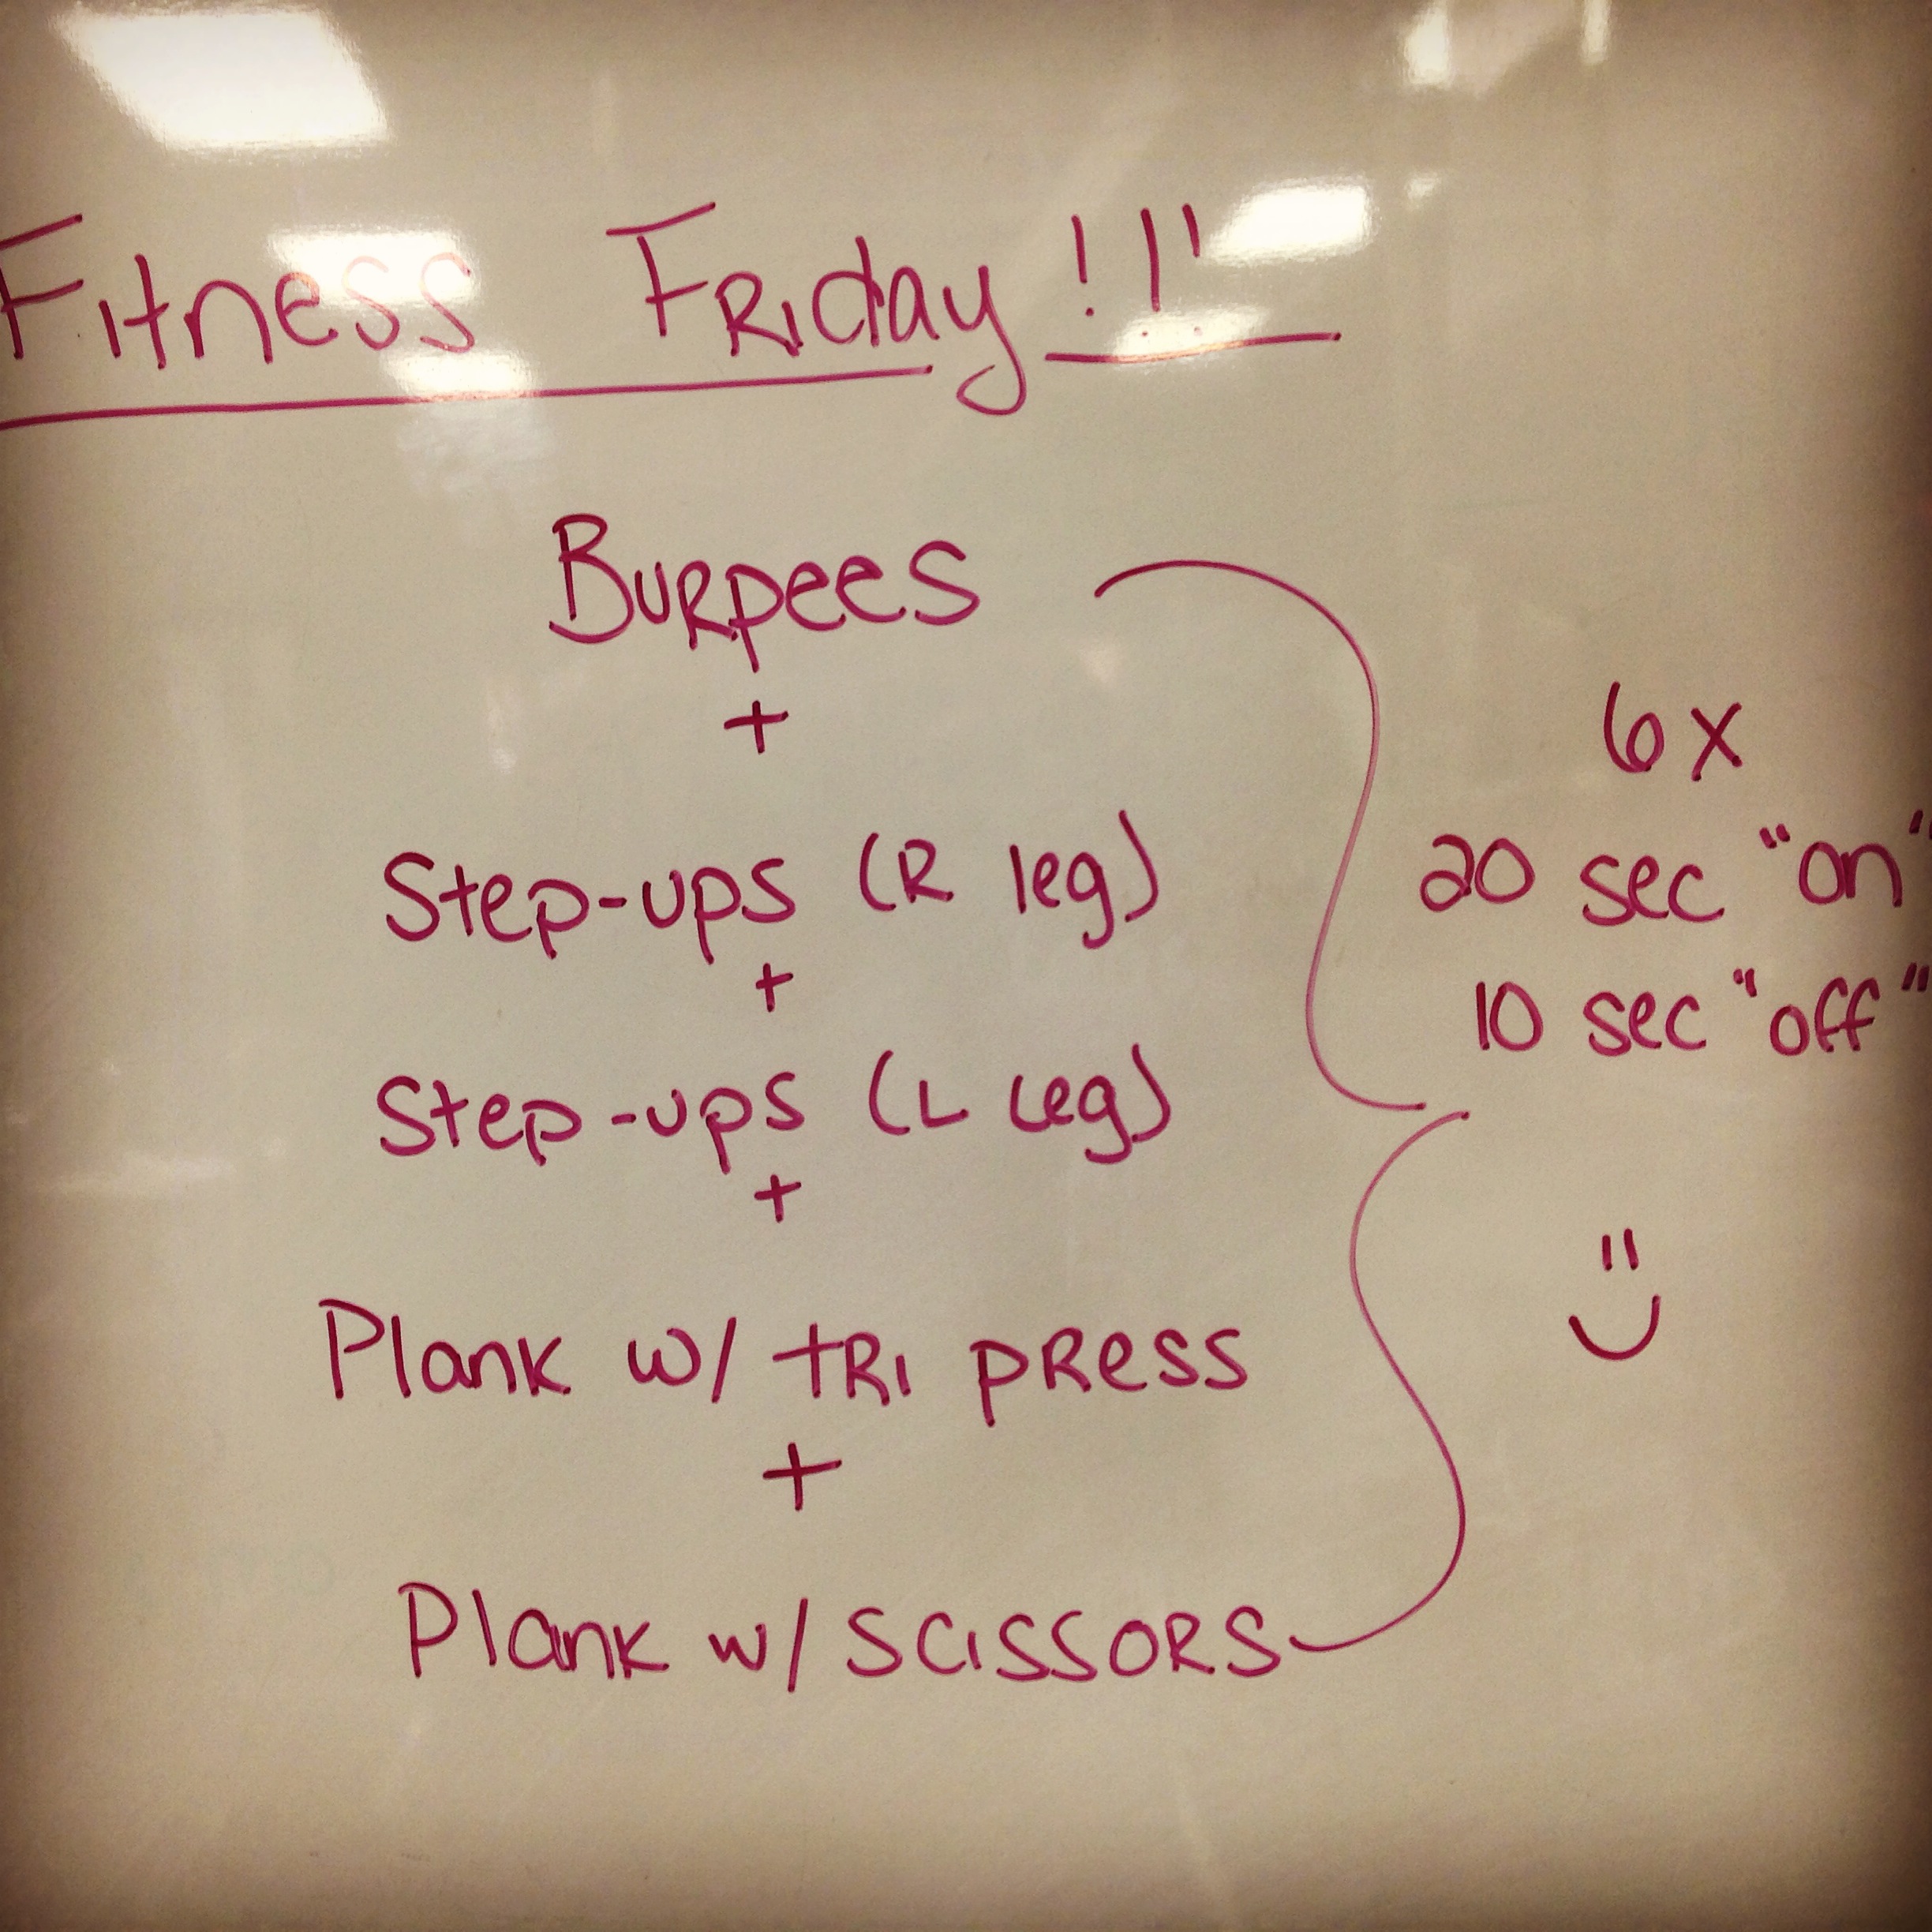
The 25-minute Interval Workout #2: Escalated Miles

Distance (in miles)

Speed (in mph)

RPE (based on chart)

0-0.25 miles

6.0-6.5

4-5

0.25-0.50 miles

6.5-7.0

6-7

0.50-0.75 miles

7.0-7.5

7-8

0.75-1.0 miles

7.5-8.0

9

1.0-1.25 miles

6.0-6.5

4-5

1.25-1.50 miles

6.5-7.0

6-7

1.50-1.75 miles

7.0-7.5

7-8

1.75-2.0 miles

7.5-8.0

9

2.0-2.25 miles

6.0-6.5

4-5

2.25-2.50 miles

6.5-7.0

6-7

2.50-2.75 miles

7.0-7.5

7-8

2.75-3.0 miles

7.5-8.0

9

  1. Start with a 2-3 minute warm-up walk / jog on the treadmill to warm up your body and prepare your muscles for the intense work ahead.
  2. After you feel nice and warmed up, set the speed of the treadmill to a 6.0-6.5 mph speed (depending on your fitness level) and an RPE of a 4-5 "moderate activity" factor (based on the RPE chart) and run 1/4th of a mile (0.25 miles).
  3. Once you hit the 0.25 mile mark, increase the speed by 0.5 mph (up to 6.5-7.0 mph) and an RPE of 6-7. Once you hit the half mile mark, increase the speed again by 0.5 mph (7.0-7.5 mph) and an RPE of 7-8. For the last quarter of the mile, increase the speed again by 0.5 mph (7.5-8.0 mph) and an RPE of 9 ("very hard" activity factor) and hold this pace until you hit the mile mark (1.0 miles).
  4. Once you hit the 1 mile mark, reduce the speed back down to 6.0-6.5 mph and an RPE of 4-5 for the next quarter of a mile. Repeat the pattern in step 3 to increase the speed by 0.5 mph at each 0.25 mile increment until you complete the 3 miles.
  5. Reduce the speed to a comfortable walk ' jog for a 2-3 minute cool-down.
  6. You're done!

You can refer to the RPE chart to set your starting and ending pace on the treadmill and be sure to set the speed based on you OWN PERSONAL rate of perceived exertion! Remember, this workout is for you and YOU alone - work hard, but be sure to set a realistic pace so you will be able to successfully compete the 3-mile interval run :-)

RPE chart
RPE chart

(Photo: runandbehappy)

And there you have it, friends! A quick 3-mile interval run that you can complete in 25 minutes or less and enjoy the rest of your Friday and the weekend ahead! I know I will :-)

Thirsty Thursday: Super Green Matcha Tea Smoothie Bowl

Recipekellypuryear2 Comments

It's Thursday again! I don't know about you, but I am tired of all this rain we have been having in Tampa lately and I needed some brightness in my life today. The bad news is it looks like there's a 60-80% chance of rain for the next five days, but the good news is you can easily make this Super Green Matcha Tea smoothie bowl to brighten your day and load up on protein and antioxidants! I made this smoothie bowl for a power-packed post-workout lunch, but you can have this smoothie bowl whenever you need a pick-me-up meal!

Super Green Matcha Tea Smoothie Bowl

(Took advantage of the break in the rain storm to enjoy my smoothie bowl outside :-) At least my grass is green thanks to the rain!)

Ingredients:

  • 6 oz unsweetened iced green tea (I ordered mine from Starbucks on my way home from the gym, but you can brew your own green tea and chill it in the fridge for 30 minutes or so).
  • 4 oz frozen banana
  • 1 oz avocado (about 1/4th of an avocado, sliced)
  • 1-2 cups baby spinach
  • 1 scoop vegan protein powder (vanilla flavored is recommended)
  • 2 t Organic Matcha Green Tea powder
  • 1 packet Stevia (or more to taste)
  • 4-5 ice cubes
  • 3 tbsp KIND cinnamon oat with flaxseeds granola (for topping)
  • about 10 fresh blueberries (for topping)
Green tea smoothis ingredients

Instructions:

  1. Pour iced green tea into a blender and add the frozen banana, avocado slices, and spinach leaves. Blend ingredients for about 30 seconds to mix well.
  2. Add in the protein powder, Matcha powder, Stevia, and ice cubes. Blend ingredients for about 60 seconds to mix well. You may need to scrape down the sides of the blender with a spoon or spatula and blend again to ensure all ingredients are mixed well and there are no clumps.
  3. Pour smoothie mixture into a large, wide-mouthed bowl and top with granola and blueberries.
  4. Devour smoothie bowl :-)

That's it! Simple as that and you have a super, power-packed Green Tea Smoothie bowl that will fill you up and leave you feeling rejuvenated and ready to take on the day (come rain or come shine)!

Green tea smoothie nutrition

Not to mention, this smoothie bowl provides you with nearly 190% of your daily calcium requirements and nearly 740mg of potassium; 30g of lean protein, 8g of fiber, and only 10g of fat; and doesn't break the calorie bank with around 350 calories total!

So go ahead, brighten your day with this Super Green Smoothie! I know it worked for me :-)

Green tea smoothis inside

(I enjoyed my smoothie bowl with a good read, thanks to Strong magazine!)

Meal Makeover: Zucchini Pizza Boats

Nutrition, RecipekellypuryearComment

I had a lot of "me time" this past weekend (since my sweet husband was busy working at the office Saturday and Sunday) so I took advantage of my free time and tested out some new recipes! Not only did I have a blast making a mess of my kitchen, but I was able to play around with three new recipes and could not wait to share this week's meal makeover recipe with you all! If you are like me (and human) you may crave pizza nearly 365 days a year, but you may not want the high-carbohydrate and high-calorie content of the traditional pizza! Have no fear, the Zucchini Pizza Boat has come to your rescue!

This week's Meal Makeover: Zucchini Pizza Boat

Zucchini pizza complete
Zucchini pizza nutrition

This low-carb, high protein "pizza" is super easy to make and surprisingly delicious and filling (thanks to the water and fiber content of the almighty zucchini)! One serving (1 zucchini boat) provides you with nearly 36g of lean protein and a mere 13g carbohydrates and 6g total fat at only 245 calories.

The best part is that you can modify the ingredients to make this meal for yourself or for the whole family to enjoy and you can use any type of lean protein that you prefer (extra-lean ground turkey, chopped chicken breast, shrimp, tofu...)! I made this meal for my neighbor and myself with extra-lean ground turkey and used the leftover turkey in my meals for the next two days. (Meal-prepping at its finest!)

Ingredients: 2 servings (2 Zucchini Boats)

  • 6 oz cooked extra-lean ground turkey (divided) (I cooked 1.25 lbs of Jennie-O Extra-lean Turkey and saved the rest for leftovers).
  • 1 large zucchini (divided) (I found a very large, wide diameter zucchini that weighed about 12 oz)
  • 1/2 cup pizza sauce (divided) (look for low-sodium, all-natural varieties or make your own)
  • 1/2 cup 2% milk shredded mozzarella cheese (divided)
  • 1 tsp cumin
  • 1 tsp chili powder
  • 1 tsp garlic salt

Intructions:

  1. Preheat oven to 400 deg. F. Wash the zucchini well and dry with a paper towel before cutting the vegetable in half (length wise). Cut the ends off as well. Carefully scoop out the zucchini flesh and seeds with a mini ice cream scoop or spoon, but be careful not to press too hard and break the core of the zucchini. You want to leave about 1/4th of the zucchini flesh intact to make the "boat" shape for the turkey filling. Discard the zucchini flesh and seeds or save for later use in another recipe.
  2. In a large sauce pan, cook the turkey completely (no pink pieces left) and then add in the spices (cumin, chili powder, and garlic salt), remove from heat and stir in spices well.
  3. Line a cookie sheet with aluminum foil and place the zucchini halves on top of the foil (flesh side up). Fill each boat with 2 tbsp pizza sauce, then 2 tbsp shredded cheese, then 3 oz of cooked turkey, followed by remaining 2 tbsp pizza sauce.
  4. Bake the zucchini boats at 400 deg. F for 20 minutes. Carefully remove the cookie sheet from the oven and top each boat with the remaining 2 tbsp shredded cheese.
  5. Reduce the oven temperature to 350 deg. F and return the cookie sheet back to the oven and bake for an addition 5-10 minutes (or until cheese is completely melted). Keep a close eye on the cheese so that it does not burn (like mine did in the picture above)! ...ooops....
Zucchini pizza prep
Zucchini pizza prep

(Cooked turkey with spices and hollowed-out zucchini boats)

Zucchini pizza filling

(Filled boats with pizza sauce and shredded cheese)

Zucchini pizza full
Zucchini pizza full

(Filled boats with ground turkey and shredded cheese)

And that's it! We paired our zucchini boats with a mixed greens salad for a well-balanced and nutritious meal. I enjoyed every last bite of my zucchini pizza boat and the great company of my sweet neighbor, Margie :-)

I hope you will try out this meal makeover recipe and share it with your family or friends. Let me know what you think!

Fuel for the Long Run

Fitness, Nutritionkellypuryear2 Comments
long-run-meal.jpg
Pre-race Race Shirt
Pre-race Race Shirt

Part of my transformation into a “long-distance runner” was learning how to properly fuel my body before a long training run or on race day and how to refuel afterwards. The food you eat prior to a long run will significantly affect your performance and the food you eat after a long run will significantly affect your recovery and muscle mass overtime. After several trial and error attempts with pre-run and post-run meals, I was able to get my fuel and refueling down to a science and identify the most important aspects of fueling for the long run. Whether you are just starting out with long-distance running or are an avid runner, following these guidelines and tips will help you train and complete your first distance race or give you the competitive edge to get that PR you are working so hard to achieve.

(The night before my 2nd Women's Half, carb-loaded & ready to run!)

Pre-long-run: The main focus should be on consuming sufficient carbohydrates before a long run, since carbohydrates are the main source of energy during physical activity. According to the National Academy of Sports Medicine (NASM)

Strenuous exercise of all intensities makes great demands on the body’s carbohydrate stores and glycogen depletion will lead to fatigue. Because glycogen stores are limited, and because they provide a critical contribution to both anaerobic and aerobic energy production, one important objective of sports nutrition is to protect glycogen and enhance access to fat for long duration, moderate intensity activity"

and they recommend a relatively high daily carbohydrate (CHO) intake (> 6 g/kg/d) and CHO ingestion (30-60 g/h) prior to, and during, exercise in order to delay the onset of fatigue and increase long-distance performance.

For this reason, it is very important to consume a small meal or snack with a high concentration of carbohydrates prior to a long training run or race. These smaller meals or “snacks” should be consumed 30-120 minutes before a long run or race (depending on the size and contents of the meal and how hungry you feel as well as the duration of activity). These meals should be low in fat and fiber (for quicker, easier digestion), moderate in protein (10-20g), and moderate-to-high carbohydrates (30-60g easily digestible carbohydrates) for sufficient energy and optimal performance.

Examples:

  • Power Oats (closer to 90 - 120 minutes beforehand due to higher fiber content)- ½ cup cooked plain oatmeal topped with half a banana and 1 tsp agave or honey
  • Eggs and toast – 2 slices whole grain bread with 1-2 eggs (hard boiled, scrambled, over easy…)
  • Banana toast – 1 whole grain bagel, English muffin, or 1/2 a Lavash wrap topped with 1 tbsp natural nut butter and ½ banana (sliced)
  • “Last resort” options= A “clean” energy bar (like RXBar, Lara Bars, or GoMacro Bars) or homemade energy bars (click here for awesome energy bars you can make yourself!)
pre run meal
pre run meal

(My favorite pre-run meal: 1/2 a Lavash wrap with PB2 and banana slices)

Post-long-run: These meals should be consumed within 1 hour of exercise and the size and contents of the meal depend on the intensity and duration of the run. These meals are necessary to replenish the glycogen (energy) stores that were used up during the run and should consist of a 3:1 carbohydrate –to-protein ratio (3g of carbs for every 1g of protein) and low-to-moderate in fat. The carbohydrates are also important for more efficient delivery of protein to the damaged muscle tissue. As previously mentioned, low fat and fiber is important for quicker digestion and delivery of nutrients to the muscle tissue. The “window of opportunity” to replenish glycogen stores and rebuild skeletal muscle tissue is approximately 30-60 minutes following exercise, therefore it is important to consume this post-run meal within 1 hour of exercise.

Examples:

  • Peanut butter and banana sandwich – 2 slices whole grain bread, 2 tbsp natural peanut butter, and ½ banana (slices)
  • Veggie omelet and whole grain English muffin (breakfast)– 1 toasted whole grain English muffin (with 1 tbsp real fruit jam, optional) with a 1 egg + 2 egg white omelet with sautéed vegetables (spinach, tomatoes, mushrooms…)
  • Chicken and rice bowl (lunch) – 4 oz white chicken breast and sautéed vegetables over ½ cup – 1 cup brown rice (or Quinoa!)
  • Tuna salad wrap (lunch) – 4 oz chunk light tuna (in water) mixed with 1 tsp mustard and 2 tbsp plain Greek yogurt, wrapped in a small whole grain tortilla / pita with tomato slices and spinach
  • Homemade “real food” protein shakes

Protein Shake ideas: Liquids are digested more quickly than solid foods, so post-workout shakes are an extremely effective way to deliver carbohydrates and protein to muscle tissue within the “window of opportunity” – especially when whole foods cannot be consumed within an hour of exercise.

  • Chocolate milk shake – Blend 8 oz reduced-fat chocolate milk with 1 small banana and ice!
  • Green Monster shake - Blend 2 cups spinach, ½ cup plain Greek yogurt, 8 oz unsweetened non-dairy milk, 1 banana, and 1 tablespoon peanut butter with ice
  • Power Oats Shake – Blend 8 oz fat-free milk, 1 scoop protein powder, 1 cup frozen berries, 1 tbsp flaxseeds or chia seeds, and ¼ cup dry plain oats with ice
  • Search through my Thirsty Thursday Smoothie recipes for more ideas on how to make the perfect post-workout smoothie!
post run meal
post run meal

(My favorite post-run meal: Egg white omelet (with tomatoes, spinach, & avocado slices) with a side of dry Gluten-Free toast and fruit)

See!? Fueling and refueling are extremely important for long-distance running performance and can be a fun and delicious way to treat your body right :-)

Meal made in minutes: Easy egg white sandwich

Nutrition, RecipekellypuryearComment

Eggs are a very versatile lean protein and can really be eaten anytime of the day - breakfast, lunch, or dinner! This power-house of a super-food is nutrient dense, yet low in calories and contains several essential vitamins (B vitamins and vitamin A and vitamin D) and minerals (choline, selenium, and phosphorus) as well as the highest quality protein and amino acid profile that meets the needs of the human body. The whites alone contain only 16 calories (per large egg) and 4g of protein, without the saturated fat or cholesterol that is found in the yellow yolk. The best part is that egg whites can be prepared in minutes and easily incorporated into a perfect sandwich for a quick breakfast before work. Heck, you can even make this meal portable and eat it on your way into work (while driving as safely as possible, of course!)...

Quick Egg white sandwich

This week's Meal Made in Minutes: Easy Egg White Sandwich  

Ingredients:

  • 1/2 cup liquid egg whites (I used All Whites) or the egg whites of 3 large eggs
  • 2 slices whole grain bread (I used Canyon Ranch 7-Grain gluten-free bread)
  • 1 slice reduced-fat provolone cheese (I used Sargento)
  • 1 cup baby spinach leaves
  • 2 tbsp hummus (any flavor) (I used Tribe Sun-dried Tomato)
  • Cherry tomatoes (optional)
  • Black pepper or red chili flakes (to taste)

Tools needed:

  1. Toaster oven
  2. Microwaveable omelet maker (I bought mine at Amazon.com)
Egg white omelet
Egg white omelet

(All Whites egg whites with red chili flakes)

Directions:

  1. Toast bread in toaster oven
  2. While bread is toasting, prepare omelet - pour egg whites into omelet maker and season with black pepper or red chili flakes (to taste).
  3. Cook eggs in the microwave on high heat for 1 minute. Make sure whites are complete set and cooked through - if whites are still runny, place omelet maker back in the microwave for 15 seconds.
  4. Assemble egg white sandwich - spread 1 tbsp hummus on one slice of bread, then lay 1/2 cup spinach on top, then the egg whites, provolone cheese, remaining 1/2 cup spinach and the second slice of bread with remaining 1 tbsp hummus spread on top.

Viola! That's it, within 6-8 minutes you will have the perfect egg white breakfast sandwich! To take your breakfast to-go, wrap the sandwich in aluminum foil and hit the road!

This breakfast sandwich will beat any fast-food option and will fill you up with complex carbs, healthy fats, and lean protein to get you through the busy morning :-)

Feel free to play around with the ingredients. Some substitutions you can try:

  • 1 egg + 2 whites instead of all whites
  • 1/4th avocado (mashed or sliced) instead of hummus
  • kale instead of spinach
  • a whole-grain tortilla wrap instead of bread

Enjoy!

Free Fitness Friday: Intervals for the Win!

FitnesskellypuryearComment

It’s finally Friday!! Once again, the week flew by and we are already approaching the weekend! I truly don’t know where the time goes, but I know how important it is to make the time to exercise – even when I am short on time! Time really is of the essence and it may be difficult to fit in a cardio workout throughout the week, but I have great news for you! You can still get the health benefits of cardiovascular exercise in a quick 25- minute workout when you incorporate Interval Training - and you will burn twice as many calories with Interval Training in the same amount of time! Now that’s a win, win situation if you ask me!

Interval Cardio
Interval Cardio

(Photo: BodyBuilding.com)

The beauty of Intervals is that you can perform any cardiovascular exercise that you wish in nearly any setting that you desire– walking, jogging, sprinting or running the stairs outdoors; walking, jogging, and sprinting on the treadmill inside; or on the stair-master, rowing machine, elliptical, or spin bike in your house or gym – and you are able to perform the exercise at a higher intensity throughout the 25-minute workout. The key is performing the exercise at intervals of low intensity (to rest and recover) and higher intensity (to get your heart-rate up and torch some serious calories).

RPE chart
RPE chart

The intensity of the exercise is based on YOUR OWN rate of perceived exertion (RPE) and it is important to rest and recover during the lower intensity and to really push it during the higher intensity intervals. Here is a table that lists and describes the RPE method for setting the intensity level for your intervals.

(Photo: runandbehappy)

Use this chart when setting your intensity levels throughout the interval workout and be sure to warm up for the first 3 minutes at a “light activity” factor (2-3 on the RPE scale) in order to warm up the body and prepare yourself for the higher intensity work. Similarly, be sure to cool down during the last few minutes at a “light activity factor” (2-3 on the RPE scale) in order to allow your heart-rate to come back down to near resting levels and end your work out with a full body stretching session to reduce soreness and prevent injuries.

Here’s the workout! It’s only 25 minutes long (including the warm-up and cool-down) and it will be over before you know it! Trust me, you will feel the burn and will feel amazing when it’s over!

Time

Intensity (RPE)

0:00-3:00

2-3 (warm-up)

3:00-5:00

7-8

5:00-7:00

4

7:00-9:00

7-8

9:00-11:00

4

11:00-13:00

9

13:00-15:00

4

15:00-17:00

7-8

17:00-19:00

4

19:00-21:00

10 (as fast as you can!)

21:00-25:00

2-3 (cool-down)

Now that you understand how to use the RPE chart and have the Interval Training workout in front of you, let’s get this workout started!

  1. Pick your cardiovascular exercise of choice
  2. Set your Ipod to your favorite workout playlist
  3. Set your first interval speed and get going!

Have a blast “blasting” some serious calories and have a wonderful weekend ahead!

Thirsty Thursday: Easy Green & Lean Smoothie

Nutrition, Recipekellypuryear3 Comments

There is nothing more refreshing than an ice-cold smoothie after a hard workout and there's no faster method of re-fueling post-workout than by drinking a protein-packed, antioxidant-rich "Green & Lean" smoothie! I am often asked how I make my post-workout smoothies and many clients have asked me "what are the best ingredients to put into your smoothies to replenish the body's carbohydrate stores and provide sufficient protein for muscle tissue repair and growth?" These are great questions and today I am going to answer these questions and provide you all with my recipes for an Easy Green & Lean Smoothie!

Green Matcha Smoothie

Now doesn't that Green Smoothie look beautiful! This delicious smoothie was made at Village Health Market in South Tampa and, while it was packed with antioxidants, lean protein, and did not contain any added sugars, it cost me more than $6!! Now I don't know about you, but I can't justify paying a lot of money for something that I could easily make at home for less than half the price... so I decided to use this smoothie as inspiration for my homemade versions.

The main ingredients in this particular Green Smoothie are:

  • Unsweetened Almond Milk
  • Banana
  • Spinach
  • Vegan vanilla bean protein powder
  • Matcha Green Tea powder
  • 1 Stevia packet
  • Ice cubes

See how simple it would be to buy these ingredients and make several smoothies at home! The important ingredients to include are a liquid of choice (water, unsweetened non-dairy milk or low-fat milk, and even leftover coffee or cold brew coffee), fruit (banana, berries, pineapple, peaches, mango...), super green leafy vegetables (spinach or kale), lean protein source (whey protein powder, vegan protein powder, Greek yogurt, or egg white protein), extra antioxidant boost (Match powder, Maca powder, raw cocoa powder...), a natural sweetener of choice (Stevia / Truvia, maple syrup, agave, or honey), and ice cubes to blend to desired consistency. You can add in or remove any ingredients that you'd like and you can mix match until you find your favorite blends! It really can be fun to experiment with your homemade smoothies!

Here are a few of my favorite concoctions to give you some ideas :-)

Smoothie ingredients - coffee

PB and Banana Mocha Smoothie:

  • 1 cup chilled black coffee with 1/4th cup unsweetened vanilla almond milk
  • 1 small banana
  • 2 cups baby spinach
  • 1/2 cup liquid egg whites (10g protein)
  • 2 tbsp PB2
  • 1 tsp Matcha Green Tea powder
  • 1 packet Stevia
  • 5 ice cubes
Smoothie ingredients - designer whey

Spinach and Banana Smoothie:

  • 1 cup unsweetened vanilla almond milk
  • 1/2 banana
  • 2 cups baby spinach
  • 1 scoop 100% whey protein powder (vanilla) (22g protein)
  • 1 tsp Matcha Green Tea powder
  • 2 packets Truvia
  • 5 ice cubes
Smoothie ingredients - Greek yogurt

Greek PB and Banana Smoothie:

  • 1 cup unsweetened vanilla almond milk
  • 1/2 banana
  • 2 cups baby spinach
  • 1 single-serve Oikos plain Greek yogurt (15g protein)
  • 2 tbsp PB2
  • 1 packet Stevia
  • 5 ice cubes

Mix all ingredients together in a blender and voila - you have the perfect post-workout smoothie that will replenish and rejuvenate :-) Have fun mixing and matching the ingredients and coming up with your own favorite smoothies!

Stay tuned for more great Smoothie recipes every Thursday!

Meal Makeover: Shrimp and Avocado Pesto "Pasta"

Recipekellypuryear3 Comments

There is nothing more comforting to me than a big ol' plate of pasta, but there are few meals more calorically dense or higher in carbohydrates! One of my favorite meals is shrimp and spaghetti with pesto sauce and Parmesan cheese, but this meal can contain upwards of 1,000 - 1,300 calories and leaves me feeling bloated, sluggish, and curled up on the couch in the fetal position (thanks GLUTEN)! This terrible combination lead me to search for a recipe for a healthier version of my beloved Pesto Pasta that would provide me with the right combination of nutrients to leave me feeling energized and still give me that "comfort food" feel I so desperately miss. After a few trial and errors with different recipes, I decided to make my own version of a Pesto Pasta that is higher in protein, healthy fats, and antioxidants and lower in calories, saturated fat, and empty carbohydrates. I was quite surprised with the end result and could not believe how delicious my concoction was... not to mention it is naturally gluten-free, contains 2-3 servings of vegetables, and is surprisingly filling!

Let me introduce to you....

Shrimp and Avocado Pesto "Pasta"

Shrimp Pesto Zoodle Pasta

The big secret is I used zucchini and yellow squash for the "pasta" (also known as "zoodles") and avocado and spinach in the pesto sauce! I promise you won't miss the spaghetti and your taste buds will be blown away by the avocado pesto sauce!

So what are you waiting for!? Give this made-over recipe a try!

Ingredients: (Makes 4 servings)

* Avocado Pesto Sauce (About 30 calories per 2 tbsp - serving)

  • 1/2 small Haas Avocado
  • 3 tbsp fresh squeezed lemon juice (1/2 a lemon)
  • 2 cups baby spinach leaves (stems removed)
  • 10 Basil leaves (stems removed)

* Shrimp & Zoodles 

  • Olive oil spray
  • Old bay spice (to taste)
  • 12 oz pre-cooked, frozen shrimp (thawed)
  • 2-3 medium zucchinis
  • 2-3 medium yellow squash
  • 1 cup grape tomatoes
  • 1/2 cup reduced-fat Parmesan cheese (for topping)
  • Red Chili flakes (to taste)

* Tools needed:

Instructions:

  1. Combine all the ingredients for the Avocado Spinach Pesto in a food processor and blend until well combined. You may need to scrape down the sides of the bowl periodically and add a tbsp or two of water to reach desired consistency. Once the pesto reaches your desired consistency and taste, set aside in the refrigerator while you prepare the shrimp and zoodles.
  2. Use a vegetable spiralizer or mandolin slicer to turn your zucchini and yellow squash into vegetable noodles. Once all vegetables are spiralized, set aside.
  3. Spray a large skillet / sauce pan with olive oil spray and saute the shrimp with the Old Bay (to taste) until the shrimp are heated through (about 2 minutes). Add the spiralized zucchini and yellow squash and heat for another 1-2 minutes until the vegetables are heated through and soften up a bit.
  4. Remove the skillet from the heat and add the avocado pesto sauce. Mix well!
  5. Divide the shrimp and zoodles among 4 plates and top each plate with 1/4 cup grape tomatoes, 2 tbsp Parmesan cheese, and chili flakes (to taste).
Shrimp & Zoodles
Shrimp & Zoodles

(Sauteing the Shrimp and Zoodles with Old Bay :-) )

And that's all there is to it! A quick and VERY healthy meal the whole family will love, without the carb-overload and bloating! You can switch up the ingredients to your liking and be creative with your very own concoctions! Some of my favorite versions of this Pesto Pasta include grilled chicken and ground turkey with canned diced tomatoes!

Grilled chicken zoodles

(Grilled chicken breast with "Pesto Pasta")

Turkey zoodles
Turkey zoodles

(Ground turkey with "Pasta" Marinara)

Go ahead, have fun with your Pesto Pasta! You can thank me later :-)

Bon appetit!

Meal made in minutes: Chicken & Brown Rice Bowl

Nutrition, Recipekellypuryear1 Comment

I love Sundays! For many, it is a day to rest and recover from the busy week; to spend time with family and friends; and a day to enjoy some "me time." But for some, it is a day that is full of honey-do lists and endless errands; full of catching up on the list of things you left un-done from the previous week; and a day spent trying to get ahead of the game at home or at the office. For me, Sundays consist of a little bit of both - spending time with my husband and in-laws mixed in with endless chores around the house, running errands, and prepping for the week ahead. The day passes by so quickly and before I know it, it's nearing 9:00 pm and I still need to prepare my meals for the next few days. When I am short on time (which happens more often than not) my go-to meal is some variation of a Brown Rice Bowl - a super easy way to combine your favorite foods in one bowl to take to work with you for lunch or to have ready when you come home for dinner. On the menu for this Monday is one of my favorite bowls - the Chicken and Brown Rice Bowl - full of lean protein, healthy fats, complex carbohydrates, and colorful vegetables!

chicken bowl
chicken bowl

This meal (inspired by one of our favorite South Tampa restaurants, Ciccio's) is not only super easy to make, but it is loaded with nutrients and long-lasting energy! All you have to do is a little prep work the night before and you will have a meal made in minutes that will be sure to satisfy :-)

Ingredients:

  • 1/2 cup brown rice
  • 1-2 cups mixed greens
  • 4 oz cooked chicken breast meat (from a rotisserie chicken or grilled chicken breast)
  • 1/4 cup guacamole (1 single-serve guacamole packet)
  • 1-2 tbsp balsamic & olive oil dressing

Directions:

  1. Boil or steam brown rice (as instructed) I used Minute Rice and boiled 1 cup of rice for 5 minutes. I saved the rest for leftovers.
  2. While rice is cooking, remove (4 oz) chicken breast and chop into smaller pieces. I used a rotisserie chicken, but grilled or baked chicken breast is fine too). 
  3. Once rice is cooked and cooled, place 1/2 cup into a Tupperware bowl and top with mixed greens, and chopped chicken breast.
  4. Add guacamole and dressing right before serving and enjoy!

I typically eat this quick meal for lunch and take the Tupperware with me on-the-go. I recommend waiting to add the guacamole and dressing until you are ready to eat to prevent the greens from getting soggy and the guacamole from turning brown.

This is such a quick and versatile meal! You can really use any lean protein and any other vegetable your heart desires for this bowl, you just need to do a little planning and prepping the night before!

Here are some variations of the Rice Bowl for substitution ideas and inspiration:

Chicken buritto bowl
Chicken green bean bowl

(Chicken Burrito Bowl: with brown rice, spinach, grilled chicken breast, grape tomatoes, salsa, avocado, and 1 hard-boiled egg) 

(Lighter Chicken Bowl: with mixed greens, steamed green beans, grilled chicken breast, grape tomatoes, and balsamic dressing)

Here are some tips for the planning and prepping:

  • Buy a rotisserie chicken from the grocery store when you do your weekly food shopping or bake a couple chicken breasts on Sunday evening for the beginning of the week.
  • Use Minute brown rice, steam-able rice bags for the microwave, or boil a batch of rice on Sundays to use as leftovers for the next few days.
  • Look for single-serve guacamole packets (such as Wholly Guacamole)  and pour your salad dressing in small Tupperware container for on-the-go convenience.

Bon appetit!

Free Fitness Friday: Workout #2

FitnesskellypuryearComment

Happy Friday!! I don't know about you, but this week seemed to drag on and on and I was running around like a chicken with my head cut off all week! Well, it's finally Friday and time to squeeze in this week's FREE  workout! I was short on time this morning, but had an absolute blast (and blasted some serious calories) with this quick 20 minute HIIT / Tabata workout. I played around with some recordings of each exercise to demonstrate how they are done, but I am still working out the issues with editing and sharing videos! Bear with me as I learn the ropes of editing media, but at least you click the YouTube links and be able to see how each exercise is done and ensure that you have proper form!

Here we go!

Workout #2
Workout #2

As always, you want to start with 5-10 minutes of an easy warm-up and finish the workout with at least a 5-minute cool-down and stretch! The whole workout takes 20 minutes (30-45 minutes total with the warm-up and cool-down) and you'll be surprised with how much fun you'll have while burning some serious calories!

Complete each exercise (1-5) for 20 seconds of high-intensity work ("on") with a 10-second rest ("off") between each exercise until you complete the 5th exercise - that is one (Tabata) cycle. For example, do the burpees (with the jump) for 20 seconds, rest for 10 seconds, then move onto the right leg step-ups for 20 seconds, rest for 10 seconds, then move onto the left leg step-ups for 20 seconds, rest for 10 seconds, then move onto the plank with tricep press for 20 seconds, rest for 20 seconds, then finish with the plank with scissor jumps for 20 seconds. Rest 10 more seconds before moving onto the next cycle. Repeat the cycle 5 more times (for a total of 6 cycles) and then cool down for another 5-10 minutes (depending on how much time you have). You can choose any form of cardiovascular exercise to cool down, but don't skimp out on the cool- down! It's important to allow your heart-rate to come back down to near-resting levels AND stretch after a high-intensity workout!

Here are the YouTube links for demonstration purposes. The first video is me performing the burpee exercise, the second video is me performing the right leg step-ups and the left leg step-ups, and the third video is me performing the plank with tricep press and the plank with scissor jumps.

Video 1: Burpees

http://www.youtube.com/watch?v=7_XlWjJq_RQ

Video 2:  Right leg step-ups and the left leg step-ups

Video 3: Plank with tricep press and the plank with scissor jumps

Have a blast (while blasting calories) and have a wonderful weekend ahead!

Thirsty Thursday: Mocha-cado Smoothie Bowl

Recipekellypuryear3 Comments

Introducing my "Thirsty Thursday" recipe where I will share my smoothie of the week with you! I usually whip up a quick protein shake when I am in a rush after a morning workout, but today I took my time and planned out my FIRST EVER smoothie bowl concoction - The Mocha-cado Smoothie Bowl (I know, super clever of me, huh?) Smoothie bowls are all the new rage, but what is so special about being able to actually eat your smoothie with a spoon? I decided to find out and, boy, was I impressed!

Smothie bowl edited
Smothie bowl edited

(Mocha-cado Smoothie Bowl)

Ingredients:

  • 6 oz coffee (cooled to room temperature or chilled in the fridge)
  • 1/3 cup unsweetened almond milk (I used Silk unsweetened vanilla)
  • 1/2 frozen banana (2 oz)
  • 1 handful baby spinach
  • 1/5th avocado (about 1.8 oz)
  • 1/2 single-serve plain Greek yogurt (I used Oikos)
  • 1 packet (full scoop) NutraKey Vegan Protein Powder: Mochaccino)
  • 4-5 ice cubes (to blend to preferred texture)
  • 3 tbsp KIND Cinnamon Oat with Flaxseeds granola (for topping)
Smoothie ingredients

Instructions:

  1. Mix coffee with almond milk and pour into a blender
  2. Add the frozen banana, spinach, avocado, and Greek yogurt and blend (about 30 seconds). You may need to scrape down the sides of the blender to make room for the next ingredients and to make sure it all blends evenly!
  3. Add the protein powder and ice cubes and blend for 30-60 seconds. You may need to add more almond milk or ice cubes to reach your desired consistency (smoothie should be VERY thick!)
  4. Pour the smoothie into a wide-mouthed  bowl and use a spoon to scrape out any remaining smoothie from the blender (trust me, you'll want to eat every last drop... and maybe lick the blender bottle too...)
  5. Top smoothie bowl with granola and a little cinnamon if you'd like
  6. Devour smoothie bowl!

It's seriously that simple and SUPER delicious! The nutritional content of this smoothie bowl is also out of this world! The entire bowl is 375 calories with a whopping 33g protein!

Smoothie 1 Nutrition

So next time you are craving a smoothie, try my Mocha-cado Smoothie Bowl! I promise you will not be disappointed :-)

Smoothie Bowl 1
Smoothie Bowl 1

Meal Makeover: Momma's Spinach and Tomato Quiche

Nutrition, RecipekellypuryearComment

There is nothing better than a home-cooked meal that is made with love, but these hearty home-cooked meals are usually high in fat, sugar, and sodium and overall high in calories. While these recipes "have been in the family for generations," there's nothing wrong with a little "makeover" action to make your favorite home-cooked meals hearty AND healthy! Take my mom's famous Spinach and Tomato Quiche recipe, for example - while it has been in the family for years, it is not the most waist-friendly OR heart-healthy meal for the family (sorry mom!).

Quiched cooked
Quiched cooked

Today's Meal Makeover: Momma's Spinach and Tomato Quiche

Turned into Spinach and Tomato Egg White Quiche

With a simple swap of a few ingredients, I was able to turn my mother's famous (calorie-laden) Quiche into a low-fat, high-protein, Gluten-Free slim & trim Spinach and Tomato Egg White Quiche that the WHOLE family will love (and not feel guilty about having seconds)! The recipe make 6 generous servings and each serving has 180 calories, 5g fat (2g sat fat), 20g carbs, 3g sugar, and a whopping 16g protein! One serving also provides 34% of your daily Vitamin A and 45% of your daily Calcium requirements! Now that's a win, win, win situation!

So here's the recipe - super simple and ready in under 1 hour!

Ingredients:

  • 1 cup non-fat plain Greek yogurt (I used Oikos)
  • 1/2 a packet of Hidden Valley Ranch Dip (dry mix)
  • 1 & 1/2 cups unsweetened almond milk (I used Silk original unsweetened)
  • 1 cup Gluten-Free all purpose baking mix (I used Bob's Red Mill)
  • 1 cup liquid egg whites (I used All Whites)
  • 1 cup 2% (part-skim) shredded mozzarella cheese (I used Publix brand)
  • 2 cups baby spinach (I used Fresh Express)
  • Quiche Set-up
  • 1 cup diced tomatoes

(The ingredients)

Instructions:

  1. Pre-heat oven to 400 deg. F and lightly spray a 9 X 13 baking dish with olive oil spray
  2. In a large mixing bowl, combine Greek yogurt with Ranch dip mix until it's evenly mixed in. Then add the almond milk and egg whites until completely combined
  3. Add the Gluten-free baking mix and mix very well, until all clumps are dissolved and mixture is completely blended
  4. In the prepared baking dish, layer the spinach to completely cover the entire bottom of the dish, then layer the diced tomatoes over the spinach, then layer the shredded cheese over the spinach and tomato layers
  5. Slowly pour the egg white mixture over the layers and push down any floating pieces of spinach with the back of a large spoon so that the egg white mixture completely covers the other ingredients
  6. Bake in the oven for 40-45 minutes or until the cheese slightly browns and the egg whites have completely set. (Feel free to stick a tooth pick or skewer stick to test that the egg whites have set completely and the tooth pick comes out clean)
  7. Let the dish cool for about 5-10 minutes, cut into 6 even pieces and serve

** You can store the Quiche in the fridge for about 3 days and reheat in the microwave to eat at anytime of the day (breakfast, lunch, dinner, or even for a hearty snack)!

Quiche uncooked
Quiche uncooked

(The layers of spinach, tomatoes, and cheese - before adding egg white mixture)

If you are serving the Quiche for breakfast, I recommend adding a bowl of plain oatmeal with nuts and berries for added complex carbohydrates, healthy fats, and antioxidants to power your loved-ones (or yourself) up for the busy day ahead. If you plan to have the Quiche for lunch or dinner, I recommend adding in a slice of whole-grain bread and sliced avocado (i.e. avocado toast) or a side of brown rice or mashed sweet potato with a dash of brown sugar! YUM!

It's as easy as that! Now you have "tools" you need to serve up this delicious and healthy Quiche that the whole family will love! I am sure this recipe will stay in the family for generations to come :-)

Transformation Tuesday: Long Distance Love

FitnesskellypuryearComment

"Transformations" can come in all shapes and sizes. For me, the biggest transformation took place in 2009 when I moved over 1,300 miles from Mattapoisett, Massachusetts to Tampa, Florida and had this CRAZY idea to run a HALF-MARATHON! For those of you who know me well, if you asked me to run more than 3 miles prior to 2009 .... I would have laughed at the ridiculousness of your request! I never even considered running more than 3 miles! Never say "never"....

Celebrate your achievements!

 (That's me - after I finished my FIRST Half-Marathon!)

I always thought the cross-country runners and distance athletes on my high school and college track teams were CRAZY to actually enjoy running for miles on end. My idea of "fun" was sprinting as fast as I could (for a very short duration) and I loved the adrenaline burst from a quick race - but that all changed after a season-ending injury during the winter of my Freshman year in college. My sprinting days were over, but that just meant that I had more time to find a new love - a LONG DISTANCE LOVE.

Bayshore Sunset
Bayshore Sunset

(Bayshore Boulevard - my new "happy place")

One of the first things I noticed when I moved to Tampa for graduate school was that nearly everyone was outside and exercising - no matter what time of the day or time of the year! The majority of the runners could be found on beautiful Bayshore Boulevard (a waterfront road with the longest continuous sidewalk) and I aspired to join those runners while training for my first half-marathon.

So now that I set a goal for myself - running a half-marathon - the next step was to figure out how to properly train for such a race! I researched "half-marathon training programs for a beginner" and found the highly-recommended Half-Marathon Training Guide from Hal Higdon and was immediately encouraged by his easy-to-follow guide and thought, Hey! Maybe I CAN actually do this! After downloading his 12-week novice 1 program guide, I researched "Half-Marathons in Tampa" and was unpleasantly surprised that there was an annual half-marathon IN TAMPA exactly 12 weeks away.... what a coincidence! I had no other choice but to "pull the trigger" and register for the 2010 Gasparilla Half-Marathon!

gasparilla-2010
gasparilla-2010

(Photo: Google Images)

The next step was to purchase a new pair of running shoes and to get my butt on Bayshore to begin my training. The training was NOT easy and it took every ounce of my will power to not quit. I suffered through many cramps, blisters, sun-burns, and got myself stuck in many torrential downpours - but I stuck it out and completed the training program and I was SO ready for race day!

100_1887
100_1887

(Morning of the race! I was so nervous, yet excited!)

The race came and went (in about 2 hours!) and I could not believe that I actually ran a half-marathon (without stopping once to walk)! The most important thing for me was the process - not my finishing time, but the fact that I actually accomplished a challenging goal that I set over 12 weeks ago! As I approached the finish line, I had to hold back tears of joy as I picked up my pace and "sprinted" across the FINISH. The adrenaline rush was like none other that I have ever experienced and I certainly got the "runner's high" that I heard so much about. At that moment, I was on top of the world - the highest I have ever been and I was hooked!

100_1895
100_1895

(Post-race - all smiles!)

Since 2009, I completed 5 half-marathons, 1 Tough Mudder 12-mile race, and 1 FULL MARATHON! After my first marathon in February of 2012, I retired from endurance running with many memories and vital lessons learned. I learned that once you put your mind to something and set a goal for yourself, you can and WILL achieve your goals if you stay focused and motivated; I learned that even when you feel like giving up, nothing feels better than crossing that "finish line" and achieving your goals; and I learned the importance of listening to your body and resting when you need to. I also learned that there is always room for change or growth ... you just need to figure out what you want in life, set realistic goals, and go after them!

100_2599
100_2599

(Before my 2nd Half, with my best friend Meg - my ultimate running buddy)

Post-race Pre&I
Post-race Pre&I

(After my 3rd Half - with my sweet husband, my #1 fan)

Tough Mudder
Tough Mudder

(After Tough Mudder - with my adventurous & fit friend Alex)

So there's my transformation. It was a long road, but I will never look back and regret the process (nor will I forget the feeling of success)! I want that for you! And I encourage you to look deep inside and decide what your main goal is - then go after it!

Thank you for reading my story! I would love to hear your "Transformation Story" or to help you write your own. Please send me a message and let me know how I can help :-)

Want more? Look for the Perfect Pre & Post - Race Meals  blog (COMING SOON) to learn how to properly fuel before a long run or race and what to eat after the long run to refuel!.

Meals made in minutes: Super Easy Tuna Salad

Nutrition, RecipekellypuryearComment

Monday means the beginning of the busy work-week and the beginning of "not having enough time" to prepare a healthy meal during the day! For those of you who feel the same way, have no fear! Come HERE every Monday to find a super easy and nutritious recipe for a meal made in minutes!  That's right, every Sunday evening I will post a new recipe for one of my favorite meals that can be made in minutes! Make this meal Sunday night to take into work with you on Monday for a healthy lunch or wait until you come home from work and whip up this meal for a super easy dinner!

Today's Meal Made in Minutes: Super Easy Tuna Salad

Winning Combo Tuna Salad

(Proof that even a "novice chef" can make this meal!)

What you will need:

  • Two cups of your favorite mixed greens (I used Fresh Express Mixed Greens)
  • 1 single serve pouch of StarKist Low Sodium Chunk Light Tuna (2.6 oz)
  • 1 single serve Wholly Guacamole mini cup
  • 2 Tbsp plain non-fat Greek Yogurt (I used Oikos Greek Yogurt)
  • 1/4th cup cherry tomatoes (sliced in half)
  • 1/2 whole wheat tortilla wrap or Lavash bread (I used Sami's Bakery Millet & Flax Lavash)
  • 2 tbsp Balsamic Vinaigrette salad dressing
  • Red chili flakes and black pepper to taste

How to prepare it:

  • Mix the tuna with the guacamole and Greek yogurt in a small bowl, add in the chili flakes and pepper (to taste) and stir to completely combine all ingredients
  • In a serving bowl, place mixed greens and tomatoes in the bottom of the bowl and pour 1 tbsp balsmic vinaigrette on top
  • Top the mixed greens with tuna salad and pour remaining 1 tbsp dressing over the tuna
  • Serve with 1/2 tortilla or Lavash and dig in!

This meal provides all three macro-nutrients - complex carbohydrates, lean protein, and healthy fats (known as "the winning combos") - with tons of antioxidants for long lasting energy to get you through the long work day!

For a variation of this Super Easy Tuna Salad, try adding in some baby carrots for extra antioxidants! Go ahead, have fun with your food!

Tuna Salad w carrots

That's really all there is to it! A healthy meal made in minutes that doesn't skimp out on nutrients or taste!

Enjoy!

Free Fitness Friday: Quick 20-minute calorie-blasting workout

Fitnesskellypuryear4 Comments
Gym-Life
Gym-Life

That's right! Your eyes are not deceiving you... I did say "FREE"! Every Friday I will post a FREE workout that you can do nearly any where, any time - especially when you are short on time.

I know how difficult it may be to find the time to work out during the work-week (especially on a Friday) but there's no better way to de-stress from the hectic week at work than to exercise! With these quick and effective workouts, you will be able to reduce your stress, blast some calories, and set yourself up for the weekend ahead! Seriously, these workouts are only 20-30 minutes long and can be completed nearly anywhere at any time!

So.... what are you waiting for? Let's get to work!

HITT Tabata Workout 1

Today's workout - 7/10/15

So here is how you complete the workout:

Start with a 5-10 minute warm-up. This can be done by walking, jogging, biking, the elliptical, the rower machine, the stairmaster... whatever your heart desires as long as you warm up your entire body and get your heart-rate up for at lease 5 minutes. Today I chose to jog for 1 mile on the treadmill :-)

Then you start your timer - I was introduced to the Interval Timer app by a dear friend (Lindsey) and absolutely love it! The timer is so easy to use and you can download it on your smart phone to use during your workout. If you don't have a smart phone, you can easily use a stop watch.

Complete each exercise (1-5) for 20 seconds of high-intensity work with a 10-second rest between each exercise until you complete the 5th exercise - that is one (Tabata) cycle. For example, do the kettle bell swing for 20 seconds, rest for 10 seconds, then move onto the ring pull-ups (TRX pull-ups) for 20 seconds, rest for 10 seconds, then move onto the wall ball for 20 seconds, rest for 10 seconds, then move onto the plie' squat for 20 seconds, rest for 20 seconds, then finish with the plank and pike for 20 seconds. Rest 10 more seconds before moving onto the next cycle. Repeat the cycle 5 more times (for a total of 6 cycles) and then cool down for another 5-10 minutes (depending on how much time you have).  I had extra time this morning and chose to do the stairmaster for 10 minutes, but you can choose any form of cardiovascular exercise to cool down. Don't skimp out on the cool down! It's important to allow your heart-rate to come back down to near-resting levels AND stretch after a high-intensity workout!!

Motivation pic
Motivation pic

If you are not sure how to perform each exercise that is listed in the workout, simply click the links to see the proper form for each exercise. Or please feel free to ask me in the "comments" section below - I am happy to help answer any questions that you may have :-) 

(Photo: Robolikes)

And that's all there is for today, folks! Short and sweet (yet super effective)! I bet you feel better already! :-)

Meal Makeover: Meet the Meatza Pizza!

Recipe, Nutritionkellypuryear3 Comments

Hey there! Welcome to my FIRST EVER blog post! For those of you who know me well, you are very familiar with my never-ending "meal makeovers" and healthy(er) recipe posts on my Pinterest, Instagram, and Facebook pages, but now you will be able to come to one site to see all of my creative meals and recipes! I hope you enjoy what you see... make...and EAT! I figured there was no better way to start my first Recipe Blog Post than to introduce you all to the greatest thing since sliced GLUTEN-FREE bread!! Allow me to introduce the amazing "Meatza" Pizza - which just happens to be NATURALLY gluten-free and SURPRISINGLY delicious!

Meatza Pizza
Meatza Pizza

(Yes folks, it truly looks that beautiful and delicious! I took this picture right after the Meatza came out of the oven!)

When I first discovered this recipe on Pinterest, I was very intrigued to try it out myself (but was very skeptical at the same time). Now, I will admit that I am not the best cook (yet), so I enlisted the help of my (very talented and sweet) neighbor who just happens to be a pro in the kitchen. My neighbor, Margie, and I (along with the help of her 10-year old grandson) made two Meatza Pizzas earlier this afternoon and we were all surprised by how easy it was to make them (and by how much fun we had while doing it)! Within an hour, the Meatzas were done and we couldn't believe the final product. Our Meatza Pizzas looks like regular pizzas! We could hardly wait to slice up one of the Meatza Pizzas and I for one was blown away by the amazing taste and texture! Even the 10-year old boy LOVED it!

Now if you don't believe me... try it yourself! Here is the recipe that started this whole "crazy" Meatza Pizza idea (from the talented Baker By Nature).

Marg. Meatza Pizza
Marg. Meatza Pizza

(Photo: BakerByNature)

As always, I made some minor modifications to her recipe, but you could really use any toppings you would like! Here are the modified ingredients that I used to make the Spinach and Tomato Meatza:

Ingredients

  • 1 teaspoon salt
  • 1 teaspoon dried oregano
  • 1 teaspoon garlic salt
  • 1 teaspoon onion powder
  • 1 teaspoon ground black pepper
  • 1/2 teaspoon crushed red pepper flakes
  • 1.25pounds extra-lean ground turkey meat
  • 1 teaspoon worcestershire sauce
  • 2 large eggs
  • 1/2 cup grated Parmesan cheese
  • 8 ounces shredded 2% mozzarella cheese
  • 1 cup tomato sauce
  • 10 Grape Tomatoessliced in half length-wise
  • 1/4 cup baby spinach, chopped

It's truly that simple! We baked the "crusts" for 15 minutes, put our toppings on, and put the Meatzas under the broiler for 5 minutes. Once they were cooled a bit, we sliced one Meatza into 8 slices and entered "Meatza Bliss" with our first bite!

Meatza Crust
Meatza Crust

(The Meatza "crust" after baking for 15 minutes)

Slice of Meatza
Slice of Meatza

(The first bite of the first slice...mmmm)

Don't just take my word for it - try it out yourself. Like.....NOW! You're welcome :-)